Introduction
We understand the excitement of bouncing and the wear and tear that may occur over time. This comprehensive guide is meticulously crafted to equip you with the knowledge and skills necessary for trampoline hole repair – a common woe among enthusiasts. Here, we’ll delve into the reasons behind trampoline holes, emphasize the critical importance of timely repairs, and set the stage for an enlightening journey through the step-by-step trampoline hole repair process.
Common Reasons for Trampoline Holes:
Various factors, including weather exposure, prolonged use, or unexpected accidents, can lead to the emergence of trampoline holes. Understanding these factors constitutes the initial step towards effective trampoline hole repair.
Importance of Timely Trampoline Hole Repairs:
Providing prompt attention to trampoline holes is crucial for multiple reasons. Timely repairs not only extend the trampoline’s lifespan but also ensure a safe environment for all users. Neglecting holes can result in more significant damage and compromise the overall integrity of the trampoline.
Overview of the Trampoline Hole Repair Guide:
This comprehensive repair guide serves as your roadmap to healing trampoline holes, offering clear and concise instructions at every step. Whether you’re a novice trampoline owner or an experienced bouncer grappling with repair challenges, this guide is designed to demystify the process and instill confidence in addressing trampoline holes.
Throughout this journey, we encourage you to embrace the DIY spirit, take pride in fixing your trampoline holes, and, most importantly, rediscover the joy of bouncing on a surface that’s secure, sturdy, and free of holes. Join us as we delve into the assessment, tools, techniques, and preventive measures essential for effective trampoline hole repair on your beloved trampoline. Let’s embark on this trampoline repair adventure together.
Assessing the Trampoline Hole Damage
As we embark on the initial and crucial step of our trampoline hole repair journey – “Assessing the Damage” – our mission is to comprehend the size, scope, and impact of those troublesome trampoline holes. This step serves as the cornerstone for effective repair, establishing the groundwork for a comprehensive and tailored trampoline hole repair process.
Examining Trampoline Hole Size and Location:
Initiate your assessment by closely scrutinizing the size and location of each trampoline hole. Small punctures might appear inconsequential, but even the tiniest holes can compromise the integrity of the trampoline surface. Take note of the distribution of holes and their proximity to one another.
Identifying Surrounding Damage:
Trampoline holes rarely exist in isolation. Scrutinize the surrounding areas for potential wear and tear, stress marks, or weakened fabric. Identifying any additional damage ensures a holistic approach to revitalizing your trampoline, preventing future issues that may arise from overlooked wear.
Assessing Overall Trampoline Condition:
Extend your assessment beyond the immediate area of the trampoline holes. Evaluate the overall condition of the trampoline, checking for signs of rust on the frame, loose connections, or general wear on the jumping mat. A comprehensive evaluation guarantees that your repair efforts address both specific trampoline holes and potential underlying issues.
Remember, the goal of this assessment is not merely to identify trampoline holes but to gain a comprehensive understanding of your trampoline’s health. Armed with this knowledge, you’ll be well-prepared to move on to the next steps of the trampoline hole repair process.
Pro Tips:
- Use natural light or a flashlight to ensure a thorough examination of each trampoline hole.
- Mark the locations of the trampoline holes for easy reference during the trampoline hole repair process.
- Take clear pictures of the damage for reference, especially if seeking assistance or ordering replacement parts.
By assessing the damage, you’re not just identifying trampoline holes; you’re laying the groundwork for a trampoline that will soon be free from wear, tear, and ready to bring joy through countless bounces. Next, we’ll guide you on gathering the essential tools and materials needed for a successful trampoline hole repair. Stay tuned, and let’s revitalize that trampoline together!
Gathering the Tools and Materials
Gearing Up for Trampoline Hole Repair
Welcome to the initiation of our trampoline hole repair journey! Here, we’ll delve into the indispensable tools and materials required to embark on a successful trampoline hole repair mission. Gather your trampoline hole repair essentials as we ensure you have everything needed to breathe new life into your beloved bouncing haven.
-
Patching Material:
Select high-quality patching material compatible with your trampoline fabric. Consider opting for a patch kit specifically designed for trampoline hole repair. A vinyl repair patch suits vinyl-coated trampolines, providing durability and weather resistance. For polypropylene or mesh trampolines, UV-resistant polypropylene repair fabric offers a robust solution against tearing and fading under sunlight. Alternatively, heavy-duty trampoline repair tape is a versatile choice for quick and efficient patching. Ensure the chosen material aligns with your trampoline’s specifications and caters to the unique demands of trampoline use.
-
Scissors or Utility Knife:
Equip yourself with a pair of sharp scissors or a utility knife for precisely cutting the patching material to the required size, ensuring accuracy for an effective trampoline hole repair.
-
Adhesive or Glue:
The adhesive or glue you select plays a pivotal role in healing the patched areas of your trampoline. Opt for a weather-resistant adhesive formulated for outdoor use, capable of withstanding various environmental conditions. Consider heavy-duty fabric glue for a seamless bond with trampoline materials, providing flexibility and durability. Alternatively, marine-grade adhesive, like E6000, Tear-Aid, or Bish’s Original Tear Mender, is renowned for its strength and effectiveness in trampoline repairs.
-
Sewing Repair Kit:
Include a sewing repair kit containing a needle and thread, tailored for the specific material of your trampoline. Whether it’s vinyl, polypropylene, or another fabric, compatibility is essential for a successful trampoline hole repair.
-
Clean Cloth or Rag:
Prepare a clean cloth or rag for wiping and cleaning the trampoline surface. Ensure the surface is free from dust, debris, and moisture for optimal adhesion during the trampoline hole repair.
-
Measuring Tape:
Have a measuring tape on hand to accurately measure the size of the trampoline holes and cut the patching material accordingly. Brands like Stanley, Komelon, or Milwaukee offer reliable options, instilling confidence and precision in your measurements.
-
Marker or Chalk:
Marking the holes is crucial for maintaining a clear reference during the trampoline hole repair process. A reliable permanent marker, such as a Sharpie, or a chalk marker for temporary markings helps identify and prioritize areas in need of attention. Brands like Chalkola or Crayola provide chalk markers known for their vibrant colors and ease of use.
-
Clear Plastic Wrap (Optional):
Opt for clear plastic wrap as an optional addition to create a smooth surface over the patched area, offering an extra layer of protection and helping maintain the trampoline’s aesthetics.
Investing in high-quality patching materials is paramount for a durable and long-lasting trampoline hole repair. Trampoline-specific patch kits are designed to withstand the rigors of bouncing, weather exposure, and provide a secure barrier against further damage. Most trampoline patch kits and repair materials are available at local hardware stores, specialty trampoline retailers, or online. Check with the manufacturer for specific recommendations or replacement parts compatible with your trampoline model.
Cleaning and Preparing for Trampoline Hole Repair
Prior to initiating any trampoline hole repair work, it’s crucial to commence with a pristine foundation. Employ a clean cloth or rag to methodically wipe down the affected area, eliminating dirt, debris, and any loose particles that could impede the adhesion of your patching material. This essential step ensures a smooth and debris-free surface, laying the groundwork for a successful trampoline hole repair.
A clean and dry surface serves as the canvas upon which your trampoline hole repair masterpiece will unfold. Moisture and contaminants have the potential to compromise the effectiveness of adhesives and patching materials. It’s imperative to confirm that the cleaned area is thoroughly dry before progressing to the subsequent steps, ensuring optimal conditions for a secure and enduring trampoline hole repair.
Exercise care and gentleness when removing debris from the damaged area, avoiding any additional harm to the trampoline fabric. A soft-bristled brush can prove useful for eliminating dirt without risking tears.
For stubborn stains, contemplate the use of a mild detergent or trampoline cleaner. This can assist in lifting dirt, ensuring a comprehensive cleaning process without compromising the integrity of the fabric during trampoline hole repair.
Trampoline Hole Repair Techniques
Patching Techniques
Patching a trampoline hole requires a tailored approach based on the size and location of the holes. For smaller punctures, consider using adhesive patches from a comprehensive trampoline hole repair kit. These patches are formulated to establish a secure bond with the fabric, resulting in a seamless and durable trampoline hole repair.
Larger tears may benefit from fabric glue and a matching patch, ensuring a robust connection capable of withstanding the dynamic stresses of bouncing.
Step-by-Step Instructions for Each Technique:
As we progress on our journey toward trampoline rejuvenation, the focus now shifts to the hands-on process of repairing those pesky holes and tears.
Here, we’ll guide you through the meticulous art of trampoline hole repair, ensuring a seamless restoration that heralds a renewed era of bouncing joy.
Adhesive Patches: A Swift Solution (Method 1)
- Prepare the Area: Initiate with a clean and dry trampoline surface. Wipe down the damaged area to eliminate any debris or dirt hindering adhesion.
- Choose the Right Patch: Select an adhesive patch from your trampoline hole repair kit, ensuring it is slightly larger than the trampoline hole for ample coverage.
- Apply the Patch: Peel off the backing from the adhesive patch and delicately place it over the trampoline hole. Press firmly, ensuring the absence of air bubbles. Smooth out the edges for a secure bond.
- Allow Drying Time: Adhere to the manufacturer’s instructions for drying time, typically ranging from a few hours to overnight. Patience during this phase ensures a robust and durable trampoline hole repair.
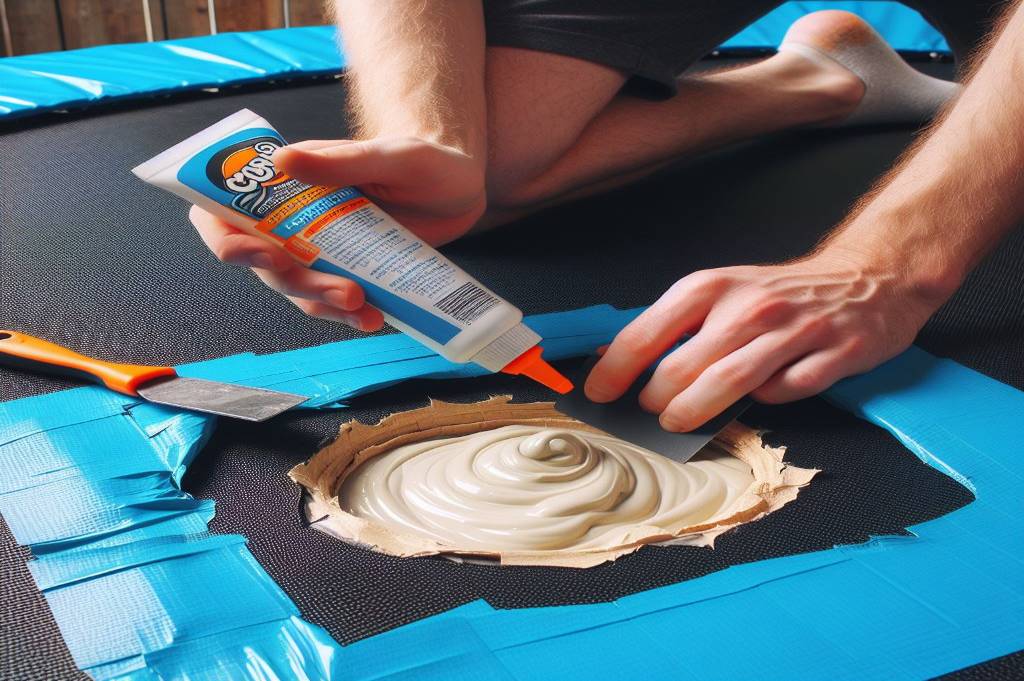
Fabric Glue Method: Precision in Every Stitch (Method 2)
- Cutting the Patch: Measure and cut a patch from your chosen patching material, slightly larger than the trampoline hole for comprehensive coverage.
- Apply Fabric Glue: Gently apply fabric glue to both the patch and the damaged area, spreading it evenly to avoid excess and prevent seepage.
- Position the Patch: Carefully place the patch over the hole, ensuring correct alignment. Press down firmly to create a strong bond between the patch and the trampoline fabric.
- Drying Period: Allow ample time for the fabric glue to dry, ensuring a secure connection and optimal resilience. Follow the recommended drying time provided by the fabric glue manufacturer.
Patching a Trampoline Hole Using a Sewing Repair Kit (Method 3)
- Clean the Area: Commence by cleaning the damaged area to ensure optimal adhesion, clearing away any dirt or debris hindering the trampoline hole repair process.
- Cutting the Patch: Measure the hole and cut a patch from the repair kit material, ensuring it is slightly larger than the hole for comprehensive coverage.
- Thread the Needle: Thread the needle carefully, using a thread color that closely matches the trampoline fabric for a seamless repair.
- Sewing the Patch: Position the patch over the hole and commence sewing along the edges, utilizing a strong and secure stitching pattern for firm attachment.
- Knotting and Finishing: Securely knot the thread upon completion of the stitching. Trim any excess thread for a polished and neat finish.
Finishing Touches: Ensuring Weather-Resistant Results
Regardless of the technique chosen, the final touch involves ensuring the patch is weather-resistant. Double-check the specifications of your chosen patching material to confirm its ability to withstand outdoor elements.
Conduct a visual inspection to ensure the patch is securely bonded, free from air bubbles, and seamlessly integrated into the trampoline surface.
Securing the Trampoline Hole Repair
Now, let’s delve into the steps that extend beyond the initial trampoline hole repair, ensuring its endurance against time and countless bounces. Discover how to fortify your efforts and add an extra layer of strength to your newly restored bouncing haven.
Guidance on Reinforcing the Patch:
- Visual Inspection: Begin by conducting a thorough visual inspection of the patched area. Ensure the patch is securely bonded, free from any air bubbles, and seamlessly integrated into the trampoline fabric.
- Apply Additional Adhesive: If using an adhesive patch for the trampoline hole repair, consider applying an extra layer of weather-resistant adhesive around the edges of the patch. This step reinforces the bond and guards against potential water penetration.
- Use an Overlapping Technique: For larger tears or holes, consider adopting an overlapping technique. Apply a second patch that extends beyond the edges of the initial patch. This overlapping approach creates a layered and fortified trampoline hole repair.
Tips for Maintaining the Repaired Area:
- Regular Inspections: Cultivate the habit of regularly inspecting the repaired area. Check for any signs of wear, loose edges, or changes in the trampoline fabric’s tension.
- Gentle Cleaning: When cleaning your trampoline, take a gentle approach around the repaired area. Avoid using harsh chemicals or abrasive brushes that could compromise the integrity of the trampoline hole repair.
- Address Issues Promptly: If you observe any issues with the repaired area, address them promptly. Timely attention to wear or minor damage can prevent more significant issues from arising.
Ensuring a Secure and Stable Trampoline Surface:
Reinforcing the trampoline hole repair isn’t just about adding strength to the patched area; it’s about ensuring the overall stability of your trampoline surface.
Double-check the connections between the jumping mat and the trampoline frame. Tighten any loose springs or securements to maintain a stable and safe bouncing experience.
By following these steps to secure the trampoline hole repair, you’re not just fixing trampoline holes – you’re building a trampoline that promises durability and lasting flexibility.
Preventive Maintenance Tips
Let’s shift our focus to the proactive phase, armed with the knowledge of trampoline hole repair and reinforcement. These tips will guide you in safeguarding your trampoline against future wear, tear, and potential issues. Let’s explore how to sustain the bounce and keep your trampoline in optimal condition for countless joy-filled moments.
Advice on Avoiding Future Holes and Damage:
- Limit Sharp Objects: Encourage users to remove sharp objects, such as shoes, jewelry, or any items with protruding edges, before bouncing. This simple practice can prevent punctures and unnecessary stress on the trampoline fabric, reducing the need for future trampoline hole repair.
- Regularly Inspect the Area: Periodically check the surrounding area for potential hazards like branches, twigs, or debris that could cause damage during windy conditions. Keeping the area around the trampoline clear contributes to its longevity.
Discussion on Routine Maintenance Practices:
- Tighten Loose Connections: Regularly inspect and tighten any loose bolts, nuts, or connections in the trampoline frame. This ensures structural stability and prevents excessive movement during use.
- Check Springs and Jumping Mat: Examine the springs and jumping mat for signs of wear, rust, or damage. Promptly replace any worn-out components to maintain optimal tension and a safe bouncing experience.
Encouragement for Proactive Trampoline Care:
Foster a culture of proactive care among trampoline users. Educate family members or users about the importance of responsible bouncing practices and routine inspections, reducing the occurrence of trampoline holes.
Consider creating a maintenance schedule, setting aside specific times for detailed inspections, cleaning, and minor repairs. This consistent effort can significantly extend the life of your trampoline and minimize the frequency of trampoline hole repair.
Preventive maintenance emerges as the final key. By adopting these proactive measures, you’re not maintaining a piece of outdoor equipment; you’re preserving a source of joy, laughter, and family bonding. As we conclude this series, let’s celebrate the journey of trampoline care and the countless bounces yet to come. May your trampoline continue to be a hub of happiness and excitement in the great outdoors!
Conclusion
As we arrive at the culmination of our journey through the “Trampoline Hole Repair Guide: Masterful Fixes for Unleashing Bouncing Power!” it’s a moment to reflect on the steps we’ve taken together. Armed with patches and glue, we embarked on the mission of fixing trampoline holes, determined to restore the exhilaration of bouncing. Those once troublesome holes on your trampoline now proudly stand as badges of victory and strength.
This guide transcends mere instructions; it’s a narrative of how you nurtured your trampoline. Every meticulous step, from scrutinizing the trampoline holes to selecting the perfect patch and applying it with care, contributed to the revival of your trampoline. The mended spots on your trampoline don’t just conceal holes; they tell a story of love, attention, and a pledge to continue reveling in outdoor fun.
Now that your trampoline is revitalized, envisage the thrilling moments it will facilitate – children laughing, people jumping, and friends enjoying together. The patched-up trampoline holes aren’t just closed gaps; they are emblems of your trampoline’s transformation from weariness to resilience, ready for an abundance of joyful bouncing experiences.